
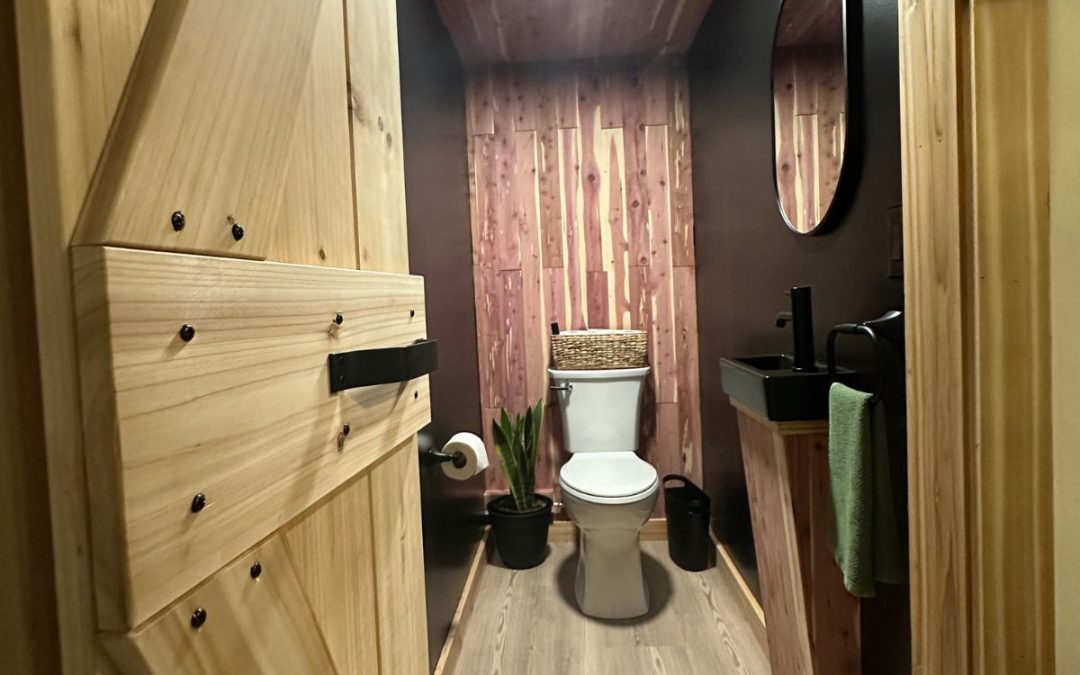
Every home has that one space you avoid showing guests – and for us, it was the basement half bathroom. Or, as we used to call it, the “scary toilet closet.”
The previous home owners left it dark, unfinished, and honestly, a little creepy.
With no flooring, no ceiling, no sink, moldy drywall, a pull-string light bulb dangling overhead, and an old door that swung in just enough to trap you in place – it was not the cozy, functional space we needed.
Thanks to my husband, Travis, and his incredible work through Blue Bird Construction, this once-dreaded corner of our house is now a cozy, rustic retreat we’re proud to show off.
In this blog post, I will share the before-and-after transformation along with the details that made this remodel so impactful!

🧱 Before: The Haunted Utility Closet Vibes
When we first moved into this house, we knew the water closet, or toilet room, was going to be out of use until we had time to renovate it.
I’m not kidding when I say there was NO sink and spiders hanging in every corner!
Here’s what we started with:
- Cracked concrete floors
- Moldy, damaged drywall
- No ceiling or proper lighting
- Exposed plumbing and wiring
- A toilet 3″ off center
- No sink (awkward to think there was no hand washing!)
- An inward-swinging door that made the already-cramped space feel claustrophobic

We knew it had potential, and were grateful for the plumbing already in place, but it needed a complete overhaul before we could use it.
When you live in a 1 bathroom house, you know just how important it is to add a half bathroom – especially when friends or family come to visit.
For a couple years, I have been looking and writing about half bathroom remodels on a budget – this was a great way to get motivated and inspired for our renovation.
🛠️ The DIY Bathroom Renovation Process
After completing our full bathroom remodel, we had a design plan in mind for the basement.
Here’s what Travis did to bring this tiny bathroom back to life:
- Demo and Rebuild: Travis gutted the damaged drywall, restudded the side walls, and hung new drywall.
When he started demo, he found a small amount of mold on the drywall. He then tore out the lower half on both the inner and outer wall.

Accent Wall: Travis used gorgeous red-tone cedar planks in a vertical pattern along the back wall. Since the back wall is cinder block, he added studs so he would have something to attach the cedar planks too.

- Lighting: Gone is the dangling pull-string bulb! Thanks to our electrician friend, Holden, the electrical was updated so Travis could install a modern can light and a wall switch.
- Cedar Ceiling: A full cedar ceiling now adds warmth and cabin charm. The ceiling is only 7ft, which is why he chose to run the cedar boards vertically – to give it the illusion of more head space.
- Flooring: New vinyl flooring instantly warmed up the space.
- Toilet Replacement: The old toilet was swapped for a sleek, new model. Then, he used cedar to hide the toilet plumbing – giving it a polished look!

- Fresh Paint: We chose Tri-Corn Black by Sherwin-Williams for the side walls—it’s bold, modern, and makes the natural wood tones pop. This is the same color we used for our brick fireplace makeover.
- New Sink: He tied into the washer plumbing just on the other side of the wall to add a brand new tiny wall-mounted sink—a game-changer for function.
The new sink did not come with a faucet, so we got to shop around for what we liked. He ended up installing single-hole black faucet to complete the look.


- Cover the Plumbing: This is the attention to detail that made such a difference. Looking at the picture above, you can see where he covered the pipes to the left of the toilet. Now, look at the sink (above) and notice the plumbing exposed. To cover this, he had a vision of wrapping it in cedar while also building a frame to better support the sink. (see below)


Since this plumbing is tied into the washer and dryer on the other side of the wall, I couldn’t help but think about a DIY laundry room as our next project!
- New Door: The swing door was replaced with a barn-style bifold door complete with beautiful black hardware and a space-saving track system.

Here is a Bifold Barn Door similar to the one we used – the wood design is just slightly different. The door we purchased is meant to be for a closet and came with a handle, but we had to purchase another handle for the inside of the door.


- Door Trim: He tore out and replaced the old door trim with fresh, modern, cedar trim – on both the inside and outside of the door.


🌲 After: A Cozy, Rustic Bathroom Nook
Now when guests walk into this once-scary space, they’re met with the results of this half bath remodel:
- A warm cedar aesthetic
- Stylish black-and-wood finishes
- A compact but fully functional layout
- A vibe that feels like a modern cabin tucked in the Blue Ridge Mountains

We added a little greenery, a round mirror, and a simple towel hook to keep it minimal and tidy.

Here’s the best part—this entire project was done with DIY skills and love. Travis poured hours of hard work into making this space both functional and beautiful, and it’s now one of my favorite little corners of our home.
🛠 Interested in a Bathroom Renovation?
If you’re local to Western North Carolina and looking for a bathroom remodel, email Travis at Blue Bird Construction (tk@bluebirdconstructionNC.com) —he and his crew specializes in custom renovations that blend style with function (and a whole lot of heart).
Thanks for following along on our home renovation journey. If you love DIYs, before-and-afters, and all things cozy cabin life, make sure to subscribe to our newsletter and stick around—we’ve got more transformations coming soon!

